Send Email From Your Own Custom Sending Domain
By default, the marketing emails you send through Heights Platform — Email Campaigns and Email Automations — are delivered from a Heights Platform sending address. You can connect your own custom sending domain instead, so your emails arrive from an address on a domain that you own, such as hello@mail.yourdomain.com.
Your sending domain does not have to be the same domain you use for your website. Many creators host their website with one domain and send email from a different one, and that works perfectly fine here. Connecting a sending domain only changes the address your emails are sent from — it never changes your website's address.
Where to Find Your Email Sending Settings
All of the email sending options live in one place: the Sending Settings screen. You can reach it from two spots in your Creator Dashboard:
- In the Email Campaigns area, click Sending Settings in the tab navigation at the top of the page.
- In the Email Automations area, click Sending Settings in the tabs at the top of the automations list.
Getting Approved to Send Campaigns and Automations
Before scheduling a new campaign or activating or resuming an automation, your account owner completes a two-step setup. This applies to both existing and new accounts. In Sending Settings, click Get started. First, tell us what you will share with your audience and add a full physical mailing address. A business address or PO box is fine. The address appears in your email footer to meet email rules, including CAN-SPAM. Campaigns already scheduled before this setup was introduced continue as scheduled.
Click Continue to choose Use our domain (coursenotification.com) or Use my own domain, then Finish setup. Back lets you revise your details. You can add a custom domain later; it is not needed for approval.
Sender approval and domain verification are separate. If your setup needs a closer look, the modal shows that it is under review. Return to Sending Settings and choose Check status. If sending cannot be enabled, contact our support team. You can keep editing drafts while you wait.
After approval, Heights prepares delivery for your account automatically. You do not need a separate email-service account, API credentials or webhook setup. If Sending Settings says setup is still finishing, check back shortly or contact support if the message persists. Emails, including tests, wait until your sending setup is ready.
Your domain is verified confirms your DNS records, not that account delivery setup is complete. If you see Sending setup needs attention, contact support. You do not need to change your verified domain records. The test-email button stays disabled until approval and delivery setup are ready.
Setting Up a Custom Sending Domain
On the Sending Settings screen, click Change sender or address, then choose Use my own domain. If you chose a custom domain during onboarding, the sender form opens for you. Setup has two steps: Sender details and Verify domain. Start with your sender details:
- Sending Domain — the domain your emails will be sent from, for example
mail.yourdomain.com. This can be different from your website's custom domain. - From email address — the address recipients will see, for example
hello@mail.yourdomain.com. The part after @ must match your sending domain exactly. - From Name — the display name recipients will see, for example your brand or your own name.
- Reply-to address (optional) — choose where replies go. If left blank, replies go to your account owner's email address.
Check your mailing address and click Save and continue. In the verification step, click Get DNS records. This does not change your website domain or incoming mailbox.
Adding the DNS Authentication Records
Domain authentication helps receiving mail services check that your emails are authorized. It improves trust but does not guarantee inbox delivery. Under Authentication records, each record shows its type, host, value and status. These include an account-specific ownership record and email authentication records.
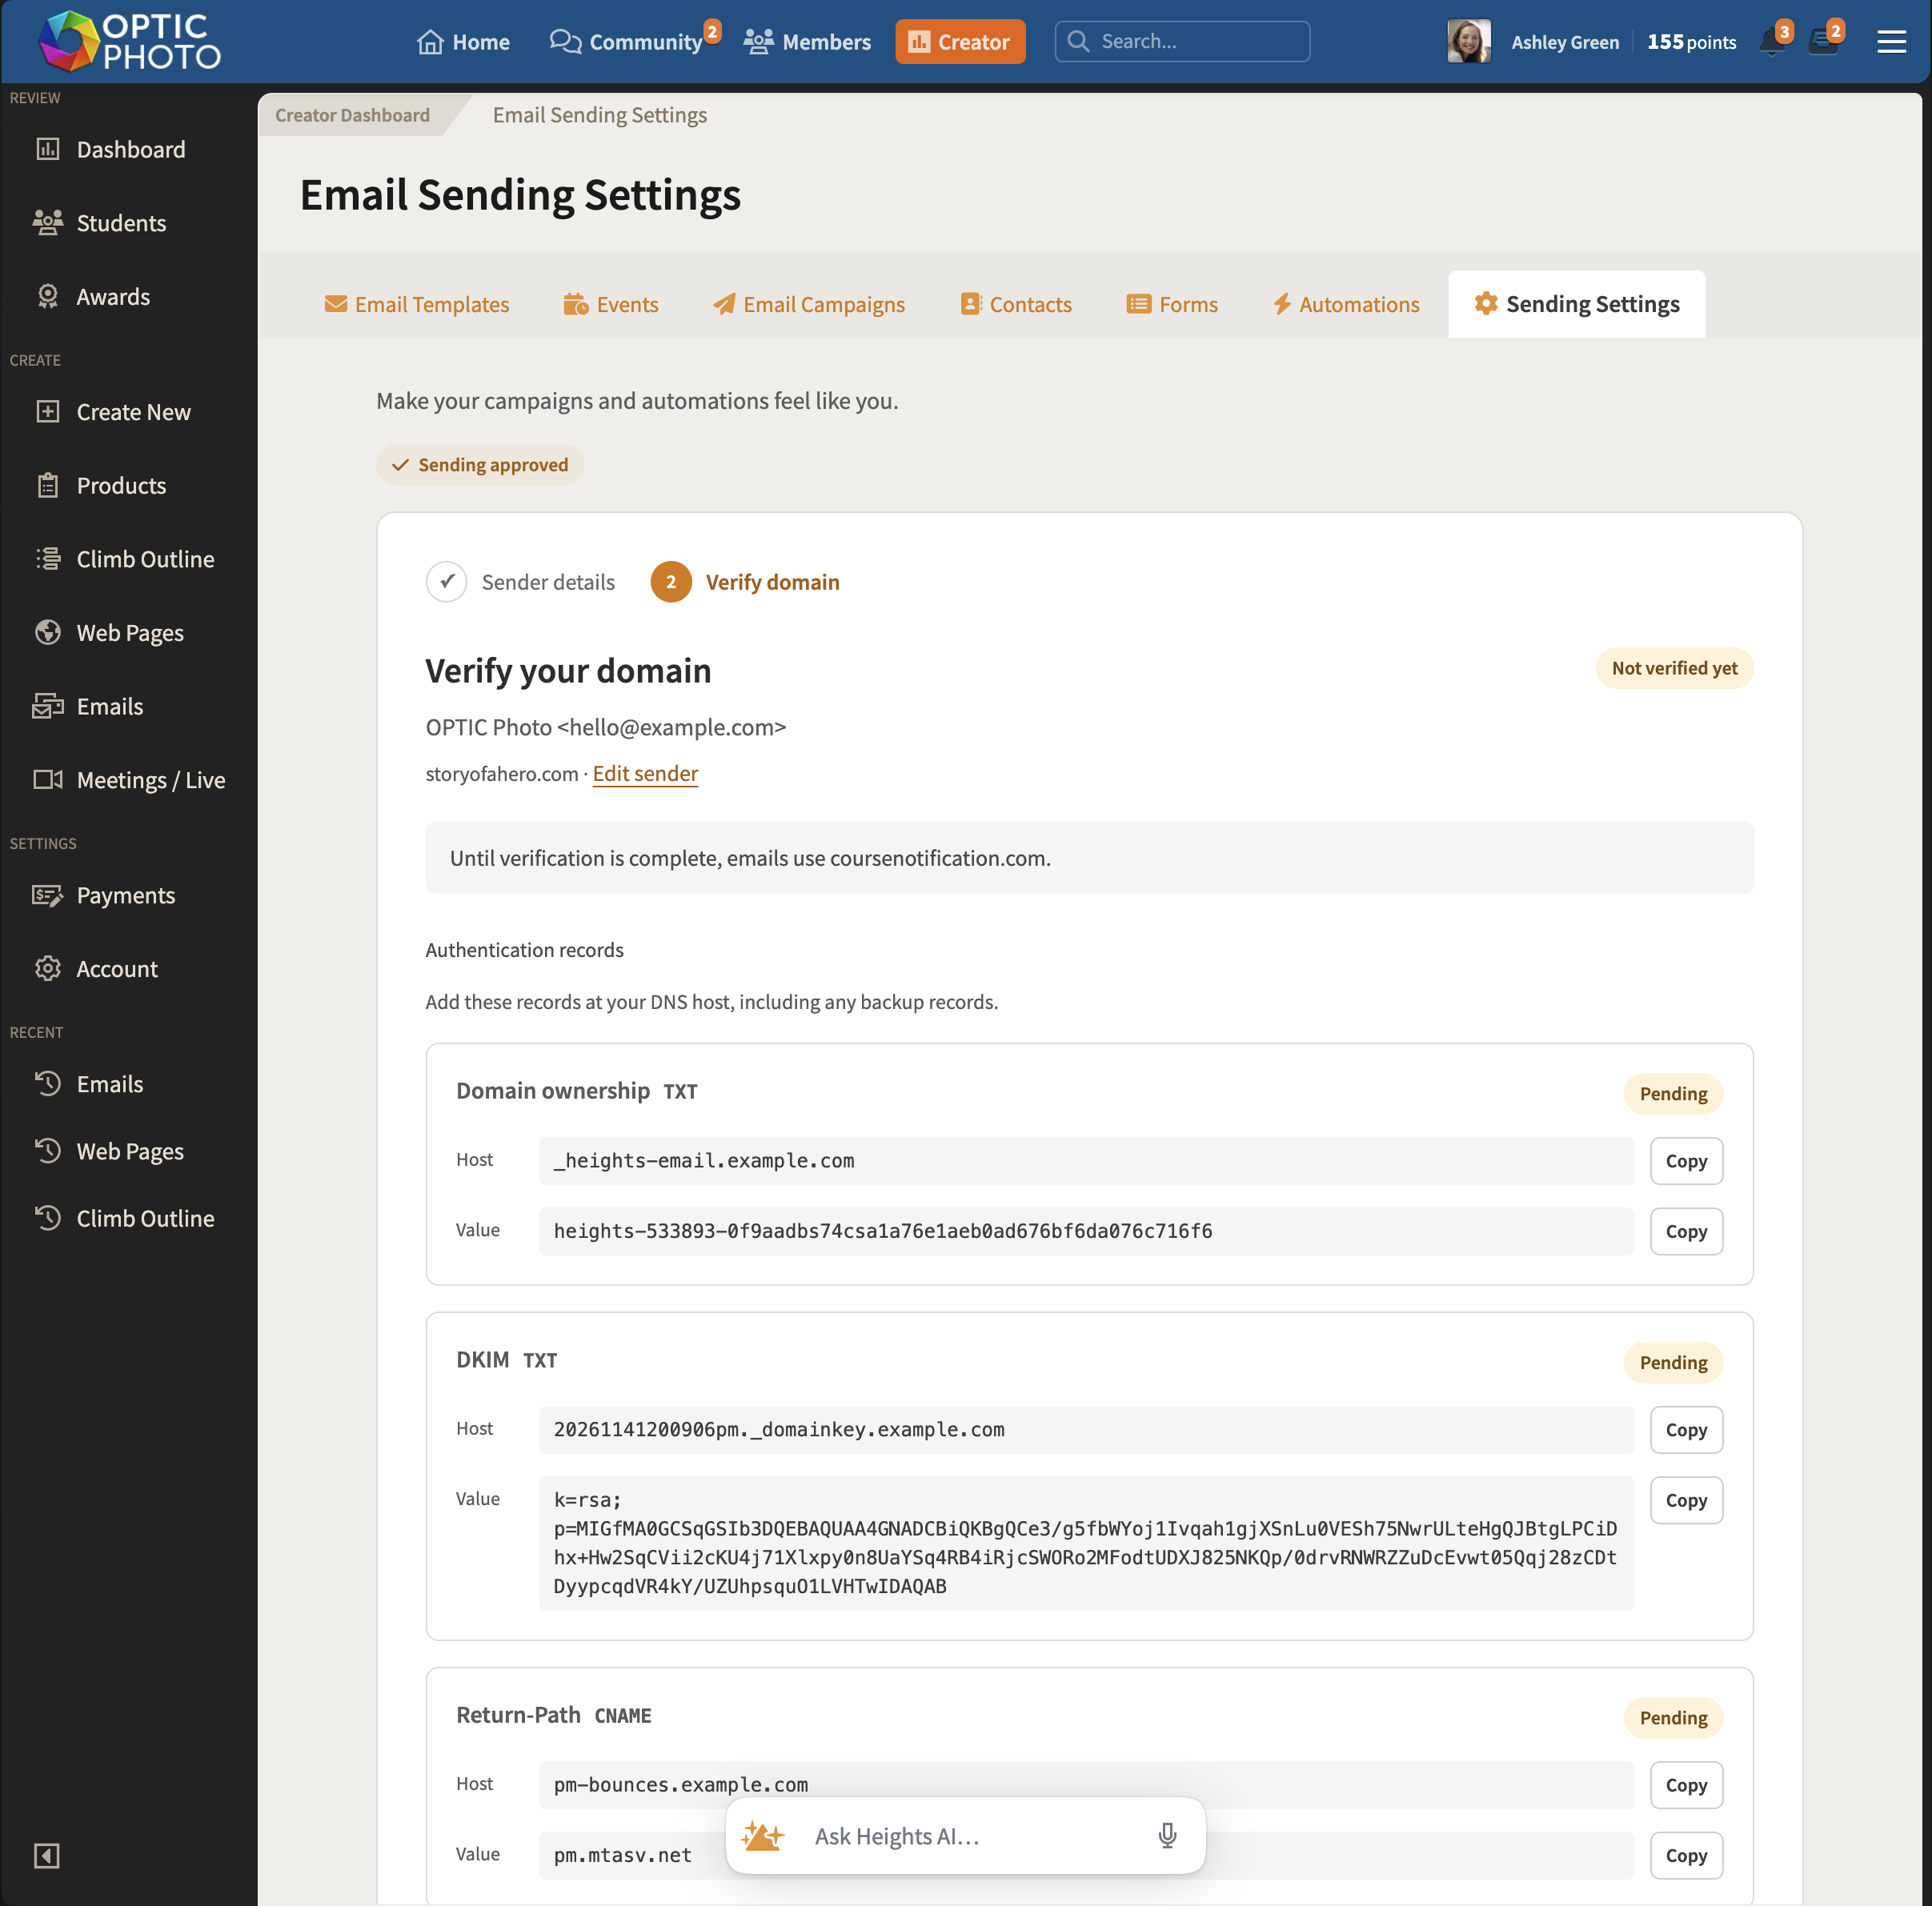
For each record, copy the Host and Value exactly as shown — each has its own Copy button — and add them at your domain registrar or DNS host. New DNS records can take up to 24–48 hours to propagate across the internet, so don't worry if verification doesn't pass right away.
If you see Backup records, add those too. They prepare your domain for backup delivery without changing your sender address. Expand Need help with DNS? for additional guidance.
Some DNS hosts automatically append your domain to the host name. Avoid adding it twice. Set CNAME records to DNS-only, not proxied. Keep existing SPF, DMARC and mail records; no MX change is needed.
Verifying Your Domain and Checking DNS Status
After you have added the records at your DNS host, return to the Sending Settings screen and click Check DNS. Heights checks each record and shows its status:
- Verified — the record was found and everything checks out.
- Pending — the record has not been detected yet. Double-check that it was saved correctly at your DNS host, or wait a little longer for propagation.
The screen also shows your domain's status and last-checked time. Until your sender is verified, campaigns and automations use the standard sending address. Save any edited sender details before checking DNS. Changing the domain clears its verification and requires setup again.
Sending a Test Email
Once sending is approved and delivery setup is ready, select your custom sender and verify the domain, then click Send test to my address. The test goes to the account owner's email address. Check both your inbox and spam folder. You can send another test after five minutes.
Changing or Disconnecting Your Sender
Click Edit sender to change your name, reply-to address or mailing address, then Save and continue. To return to the standard sender, choose Use our domain and Save changes. Your saved custom-domain configuration stays available if you switch back.
To remove your saved custom sender, expand Disconnect this domain in the verification step and confirm Disconnect domain. Disconnecting does not delete DNS records or change your website. Notification templates, receipts and other transactional email routing remain unchanged. Heights manages the delivery service for you; if additional authentication records are needed, our team can help.
Delayed or Unconfirmed Marketing Emails
If Heights cannot safely confirm that a message is ready to send, it waits rather than risking a duplicate. If an attempted send has an unknown result, it stops for review instead of automatically sending again. Contact support before resending an unconfirmed message.
Queued messages expire seven days after they were due to send. This also applies to email steps already queued when you pause an automation: resuming after that window does not send those old messages automatically. Contact support to review expired messages before arranging a new send.
Campaign and Automation Email Engagement
Open and click reporting is not included in this initial sending-settings release.